Categorias
Site SmartHack

HOW TO MAKE MONEY WITH PHOTOGRAPHY

Beginner Tips: How to Capture Amazing Photos and Make Money with Photography

Getting started in photography can seem challenging, but with the right techniques, you can capture stunning images from the very first click — even with affordable equipment. And the best part: it’s still entirely possible to turn this skill into a solid source of income by 2025. In this article, you’ll discover how to get started, what mistakes to avoid, and how to position yourself to make money from photography, even as a beginner.

1. Start with what you have — technique matters more than equipment
One of the biggest myths in photography is the idea that you need to start with an expensive professional camera. The truth is that, with good technical skills and creativity, even a smartphone can produce incredible results.

– Focus on fundamentals such as:
– Photographic composition (rule of thirds, leading lines)
– Smart use of natural light
– Purposeful framing

You don’t need an expensive lens to capture emotion, atmosphere, or visual impact. What differentiates a beginner photographer from an aspiring photographer is their understanding of visual language — and this can be learned for free with practice and study.

2. Overcome common objections and start now

“I need to invest a lot to get started.”
“I don’t have time to learn.”
“There are already a lot of people doing this.”

These are common objections, but they all have solutions. With free editing tools like Lightroom Mobile, Snapseed, or VSCO, you can already transform your photos. Plus, there are affordable online courses and free learning communities where you can progress quickly.

The market is competitive, yes. But it’s also constantly evolving, and there’s room for new perspectives, styles, and niches. The difference lies in those who learn to tell stories with authenticity.

3. How to Make Money with Photography in 2025
Yes, it’s still entirely viable to monetize photography — and today, the opportunities are even broader. Here are some real ways to make money, even as a beginner:

– Stocks: Sell your photos on platforms like Shutterstock, Adobe Stock, and iStock.
– Social Media: Create a portfolio on Instagram and offer local services (photoshoots, events, product photos).
– Content Photography: Brands and influencers need personalized images all the time.
– Sell presets and editing packs.
– Courses and e-books: If you master a style or technique, you can teach and scale it.

The key is to understand what problem you solve with your photos — and position yourself as the visual solution to that pain point.

4. Strategy and Positioning: What Separates Amateurs from Professionals
Technique is important, but strategic positioning is what transforms a good photographer into a valued professional. Start by creating an online portfolio with your best images. Use Instagram as a showcase and optimize your bio with keywords like:

– “Photoshoot Photographer in [your city]”
– “Professional Photos for Instagram”
– “Product Photography for Online Store”

Invest in personal branding, storytelling, and visual content marketing. Also, learn about SEO, sales funnels, and mental triggers. Modern photography is digital and strategic.

5. Photography as a vehicle for personal and professional transformation
The greatest transformation comes when you stop seeing photography as just a hobby and start seeing the creative, professional, and financial potential it offers.

You can build authority, attract clients, make a living from your art, and even achieve financial freedom. But it starts with the decision not to wait for “the right time” — it’s now. Learn, test, fail, publish, and grow.

You don’t have to be perfect. You need to be consistent.

Conclusion
Taking good photos is a skill anyone can develop — and the current market is brimming with opportunities for those who want to monetize this art. With dedication, strategy, and a creative eye, you can capture incredible photos and turn your passion for photography into real income.

Start your journey in Photography: from zero to advanced

Photography course for beginners
Categorias
Site SmartHack

VERT SHOCK: DEFINITIVE PROGRAM?

Vert Shock Review: The Ultimate Program to Increase Your Vertical Leap in 8 Weeks?

As a certified coach with over 10 years of athletic performance experience and a plyometrics specialist, I’ve helped hundreds of athletes break through barriers in their vertical jump—from amateur basketball players to professional volleyball players. If you’re looking for an honest Vert Shock review, you’ve come to the right place. In this article, I’ll dive deep into the Vert Shock program, analyzing its benefits, limitations, and whether it truly delivers what it promises for those looking to increase their vertical jump without expensive equipment or crowded gyms.
The vertical jump is the secret behind explosive dunks in basketball, unbeatable blocks in volleyball, and even increased power in sports like soccer and CrossFit. But not all vertical jump training programs are created equal. Vert Shock, created by Adam Folker and Gustavo Goodall—former professional players—stands out as an affordable option focused on quick results. Let’s break it down step by step.

What is the Vert Shock Program?

Vert Shock is an online plyometric training system designed to increase your vertical jump by up to 9-15 inches in just 8 weeks. Unlike generic vertical jump exercise routines, it follows a three-phase structure: Shock Phase (to activate fast-twitch muscle fibers), Max Phase (to maximize power), and Jump Phase (to refine and sustain gains).
Everything is done with bodyweight, without the need for dumbbells, barbells, or a gym—perfect for those who train at home or travel frequently. The program includes high-quality videos, PDF guides, and an app to track progress, making it super convenient. And the price? At around $67 (with a 60-day guarantee), it’s a steal compared to personal trainers who charge three times that amount.

Who Is Vert Shock Best For? (And Who Should Avoid It)

Not everyone needs the same workout. Based on my experience with athletes of all levels, Vert Shock shines for specific profiles:

Perfect For:

  • Beginners and Intermediate Vertical Jumpers: If you’re new to plyometrics or have an average jump (under 24 inches for men, 18 inches for women), this program offers a logical progression that builds confidence and measurable results.
  • Equipment-Free Athletes: 30-45-minute sessions, 4-6 days a week, using only your body—ideal for students, busy parents, or those who hate waiting in line at the gym.
  • Quick Results Seekers: Many users report gains of 4-6 inches in the first 4 weeks, in line with reports on sites like Hashnode and A1 Athlete.

Not Recommended For:

  • Advanced or Professional Athletes: If you already jump above 30 inches and compete at a high level, Vert Shock may seem too basic, lacking the in-depth knowledge of jumping technique or strength training (such as weightlifting) you need to take it to the next level.
  • Who Requires Rigorous Scientific Support: The program doesn’t cite peer-reviewed studies (such as those from the NSCA on plyometrics), which may frustrate those seeking evidence beyond testimonials. In my view, this is a shortcoming – science supports plyometrics, but personalization is key.

In short, if your goal is to increase your vertical jump quickly and without complications, Vert Shock is a solid choice. But remember: any intense plyometric training program requires warm-up, recovery, and listening to your body to avoid injuries.

Vert Shock Pros and Cons: A Realistic Analysis
After reviewing dozens of reviews and testing similar elements in my own protocols, here’s an unbiased breakdown:

Pros of the Vert Shock Program:

  • User-Proven Results: Hundreds of testimonials on forums like Reddit and specialized websites show real improvements in 8 weeks. An informal study on Hashnode highlighted average gains of 5 inches—not bad for a home workout!
  • Easy to Follow and Motivating: Clear videos, nutrition tips, and a plug-and-play calendar eliminate guesswork. As a fitness copywriter, I love how their marketing uses storytelling to keep you engaged.
  • Accessible and Barrier-Free: Zero equipment, low price, and lifetime access. Perfect for the vertical jump home workout crowd.

Cons of the Vert Shock Program:

  • Lack of Emphasis on Technique and Strength: Without specific vertical jump technique drills or weight integration, you may stagnate after initial gains. I recommend supplementing with squats and deadlifts.
  • Risk of Overtraining and Injury: It’s intense – explosive jump rope and burpees can strain your knees if you don’t have a foundation. Sites like Skillful Basketball warn against this; always consult a doctor first.
  • No Explicit Scientific Evidence: Relies on anecdotes, not meta-analyses. For me, this is okay for beginners, but not for those who want science behind every rep.

Overall, the pros outweigh the cons for 80% of users, especially if you follow it closely and listen to your body.

Is Vert Shock Worth It? My Expert Verdict
As a trainer who’s seen it all—from the failures of expensive programs to the successes of simple routines—I give Vert Shock an 8/10. It’s an incredible catalyst for increasing your vertical jump at home, with a structure that rivals premium apps like Vertimax. The results are real for beginners, and the risk of injury is manageable with common sense. But if you’re advanced, invest in something more holistic, focused on strength and technique.
What sets Vert Shock apart? It’s pure action, no fluff. In a world of fitness gurus promising miracles, it delivers real value at a ridiculously low price.

Ready to Dominate the Court? Act Now!
If you’re tired of mediocre jumps and dream of dunks that leave the crowd speechless, Vert Shock is your shortcut to the elite. With a 60-day guarantee, you risk zero—all you gain is explosiveness.

Click here to access Vert Shock with an exclusive 50% discount (valid for 24 hours) and transform your game TODAY. Don’t wait for next season; start your 8-week journey now and feel the difference in the first week. Your vertical jump—and your confidence—will thank you!
Let’s elevate it together!

VERT SHOCK - #1 Jump Program Worldwide

LIMITED TIME OFFER!
Categorias
Site 4NextTravel

#BANGKOKIN3DAYS

Bangkok in 3 Days: The Essential Guide for Tourists

Welcome to the beating heart of Thailand! If you’re planning a trip to Bangkok in 2025, this essential guide is your perfect companion. As a travel and tourism expert, I’ve created a 3-day Bangkok itinerary optimized for travelers who want to maximize their time exploring Bangkok’s top tourist attractions, such as iconic temples, vibrant markets, and delicious Thai food. This article is packed with Bangkok travel tips, including how to avoid common objections like intense heat, crowds, and scams, so your experience is unforgettable and stress-free. Keywords like “what to do in Bangkok,” “3-day Bangkok itinerary,” and “Bangkok travel guide” have been naturally integrated to help you find this content in search engines.

Bangkok, the capital of Thailand, is a metropolis that blends tradition and modernity. With over 8 million inhabitants, it is known as the “City of Angels” and offers a mix of ancient temples, gleaming skyscrapers, and a world-beating culinary scene. In 2025, the city continues to evolve with new sustainable attractions and improved public transportation, making it even more accessible. If you only have three days, focus on the essentials: history, culture, shopping, and relaxation. Let’s get planning!


Pre-Trip Planning: Essential Tips for Visiting Bangkok

Before diving into your 3-day Bangkok itinerary, prepare yourself with these practical tips for tourists in Bangkok.

Best Time to Visit

High season runs from November to February, with mild temperatures (25-30°C) and less rainfall. Avoid April (the hottest month) and the rainy season from July to October. In 2025, events like the Loi Krathong Festival in November will add magic to your trip.


Visas and Entry

Brazilians do not need a visa for stays of up to 90 days. Check the Ministry of Foreign Affairs website for updates. Arrive at Suvarnabhumi Airport (BKK) or Don Mueang Airport (DMK) – opt for the former for international connections.

Transportation in Bangkok

Traffic is chaotic, a common objection. Use the BTS Skytrain or MRT to avoid traffic jams. Metered taxis are cheap (starting at THB 35), but insist on using the meter to avoid scams. Apps like Grab are safe and convenient. For the Chao Phraya River, express boats cost around THB 20 per trip.

Budget and Currency

Bangkok is affordable: expect to spend THB 2,000-4,000 per day (including accommodation, food, and attractions). Exchange money at exchange bureaus at the airport or use ATMs. Credit cards are accepted in hotels and shopping malls.Hospedagem Recomendada

Stay in central areas like Sukhumvit or Silom for easy access to transportation. Options include boutique hotels like Chatrium Riverside (river views) or budget hostels on Khao San Road.

Health and Safety

Hepatitis A/B and typhoid vaccinations are recommended. Drink bottled water and use mosquito repellent. Bangkok is safe for tourists, but avoid isolated areas at night and be wary of pickpockets in crowds. Common scams include taxi drivers who “close” attractions—ignore them and use apps.

Now, let’s get to the detailed Bangkok itinerary in 3 days!

Day 1: Discovering Bangkok’s History and Iconic Temples

Begin your adventure with the historic attractions, essential in any Bangkok travel guide. Focus on the old town to immerse yourself in Thai culture.

Morning: Grand Palace and Wat Phra Kaew

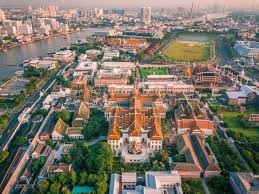
Arrive early (opens at 8:30 a.m.) to avoid crowds—a key tip for overcoming reservations about crowds. The Grand Palace (admission: 500 THB) is the symbol of the Thai monarchy, with stunning architecture and the Temple of the Emerald Buddha (Wat Phra Kaew). Dress appropriately: shoulders and knees covered (rent sarongs at the entrance). Spend 2-3 hours exploring the ornate gardens and halls.

Afternoon: Wat Pho and Wat Arun

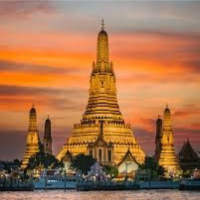
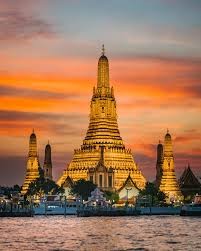
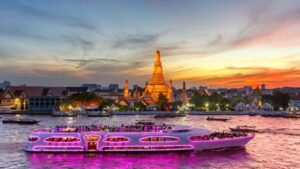
Walk to Wat Pho (200 THB), home to the 46-meter Reclining Buddha. Try a traditional Thai massage at the temple (about 300 THB for 30 minutes) to combat jet lag. Cross the river by boat (4 THB) to Wat Arun, the Temple of Dawn (100 THB). Climb the tower for panoramic views—ideal at sunset.

Evening: Khao San Road and Dinner

Finish on Khao San Road, the backpacker hub. Sample street food like pad Thai or som tam (papaya salad). If you have concerns about hygiene, choose busy vendors—street food in Bangkok is safe and delicious! Have a Chang beer at a local bar.

Total time: 10-12 hours. Distance: By foot or tuk-tuk (negotiate for 50-100 THB).

Day 2: Vibrant Markets and Modern Bangkok Life

On the second day of your 3-day Bangkok itinerary, explore the commercial and contemporary side of Bangkok, with shopping and dining.

Morning: Floating Market or Chatuchak Weekend Market

If it’s a weekend, head to Chatuchak (opens at 9 a.m., free), the world’s largest open-air market with 15,000 stalls. Shop for souvenirs, clothes, and handicrafts—bargain for 30-50% off! If it’s not a weekend, opt for a tour of the Damnoen Saduak Floating Market (around THB 1,500 with transfer). Wear sunscreen to combat the heat, a common objection.

Afternoon: Chinatown and Shopping

Head to Chinatown (Yaowarat) for an authentic lunch: try dim sum or noodles from stalls. Afterwards, visit modern malls like Siam Paragon or Terminal 21 for air-conditioning and international brands—perfect for escaping the 35°C heat.

Evening: Muay Thai or Rooftop Bar

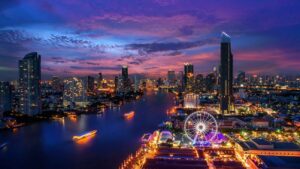
Watch a Muay Thai fight at Lumpinee Stadium (1,500-2,500 THB). Alternatively, grab a drink on a rooftop like the Sky Bar at Lebua State Tower, with views of the skyline.

Tip: Use the MRT to get around and avoid traffic, responding to complaints about congestion.

Day 3: Chao Phraya River, Parks, and Relaxation

Finish with a mix of nature and leisure, balancing your Bangkok itinerary.

Morning: Chao Phraya River Cruise

Take a boat cruise (about THB 1,000 with dinner) to see temples and riverside life. Stop at Bang Krachao, the “Green Island,” for cycling (rent bikes for THB 100/hour)—a great escape from urban pollution.

Afternoon: Lumpini Park and Jim Thompson House

Relax in Lumpini Park (free), Bangkok’s “Central Park,” with lakes and monitors. Visit Jim Thompson House (THB 200), a Thai silk museum with tranquil gardens.

Evening: Asiatique The Riverfront

Finish at Asiatique, a riverside night market with shops, restaurants, and a Ferris wheel (THB 300). Taste fresh seafood and watch the fireworks display.

For those who object to pollution, note that areas like parks and the river offer cleaner air, and masks are common.

Thai Food Guide in Bangkok: What to Try

No Bangkok guide is complete without food. Try:

  • Pad Thai: Fried noodles with shrimp (50-100 THB at stalls).


Best Pad Thai Recipe, Authentic Bangkok Street Vendor Style

  • Tom Yum Goong: Spicy shrimp soup.
  • Mango Sticky Rice: A classic dessert. Places: Or Tor Kor Market for fresh produce or Michelin-starred restaurants like Gaggan for haute cuisine.

Objection: Spicy food? Ask for “mai pet” (not spicy).


  • Nightlife and Entertainment
  • From bars in Sukhumvit to cabaret shows in Nana Plaza, Bangkok pulsates at night. For families, opt for cruises or night markets.
  • Dispelling Common Objections about Bangkok
  • Many hesitate to visit due to myths. Here, I debunk them:
  • • Heat and Humidity: Visit attractions early, wear light clothing, and stay in places with air conditioning. Drink coconut water (20 THB).
  • • Crowds and Chaos: Plan off-peak times; use apps for navigation.
  • • Scams and Safety: Avoid “free” tuk-tuks and dubious jewelry stores. Bangkok is safer than many capitals; use common sense.
  • • Pollution and Traffic: Opt for public transportation or boats; masks help.
  • Language Barrier: Learn phrases like “sawasdee” (hello). Translation apps can help.
  • Street Food Hygiene: Choose popular vendors; avoid tap water.

Conclusion: Why Bangkok Is Worth It in 3 Days

This 3-day Bangkok itinerary captures the essence of the city: sacred temples, lively markets, and unforgettable flavors. With planning, you’ll overcome any objections and create lasting memories. For extensions, add Ayutthaya or nearby beaches. Share your experiences in the comments and have a great trip! If you need more tips on what to do in Bangkok, I’m here to help.